Assigning Documents and Tool Windows
You can put interface elements in many different places. You can assign documents in the central document area and tool window to anywhere in the application window. They are then supported by application icons. Tool windows can also be used as floating windows.
The program interface can have a title bar, ribbon, side tab (for start page and model pages) and status bar; it can also contain two other interface elements: the central document area and the tool window area. The two areas differentiate from each other in the fact that tool windows can be assigned in the document area but documents cannot be stored in the tool window area.
Document Layout
Documents can only be arranged in the document window area.
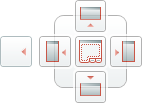
If you want to add a document to the document area using drag-and-drop, the layout icon appears for adding documents in the document area.
- Click on the tab of the document you want to add to the document area and keep the mouse button pressed.
- Move the mouse pointer in the document.
The document is shown as a rectangle and the document area's layout icon for documents appears.
- Place the mouse pointer on the icon which corresponds to where you want the document to be positioned. The position your document will be placed is shown as a grayed out area corresponding to where the mouse pointer is placed.
Tool Window Layout
Tool windows can be arranged in document and tool window areas.
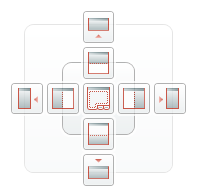
If you want to add a tool window to the document area using drag-and-drop, the layout icon appears for adding tool windows in the document area.
The inner icons show where the tool window will go in the document in tab format.
The outer icons show where the tool window will go in a new tool window area.
If you want to add a tool window to the tool window area using drag-and-drop, the tool window layout icon appears.
- Click on the title of the tool window you want to arrange in the tool window keep the mouse button pressed.
- Move the mouse pointer to where you want the tool window to go.
The document is shown as a rectangle and the respective tool window's layout icon appears.
- Place the mouse pointer on the icon which corresponds to where you want the document to be positioned. The position your document will be placed is shown as a grayed out area corresponding to where the mouse pointer is placed.
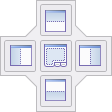
Layout Icons
| Icon | Meaning |
|---|---|

|
Assign document or tool window as tab to the current area |


|
Assign document or tool window as a document in tab form within the document window |


|
Assign tool window as a separate area within the tool window area |